Livestock producers and large-animal veterinarians face a growing problem in rural Texas—what to do with dead animals. Rendering services are getting more expensive and harder to come by, and just leaving carcasses to predators and the forces of nature is not acceptable.
So what are the options? Except for poultry, you can bury dead animals as long as you do not pollute ground or surface water. Incineration, biodigestion and chemical digestion are other disposal methods, but they are expensive, complicated or both. Composting is a simple, low-cost disposal method that yields a useful product that can be put on pastures as fertilizer.
Composting Basics
To compost carcasses successfully, you need to understand how the process works and what ingredients are needed to make good compost.

Figure 1: Leaving animal carcasses exposed to nature is not a good idea.
Composting relies on naturally occurring microbes such as bacteria and fungi. These microbes need a well-rounded diet, air, water and shelter. The most efficient ones are the thermophilic microbes, or thermophiles, which grow the best and work hard when the temperature is higher than 130 degrees F. When these thermophiles are thriving, they turn carcasses into a useful, humus-like material that doubles as a slow-release fertilizer, organic soil amendment, or water-saving mulch.
Every living being does best when it eats a properly balanced diet, and compost microbes are no exception. They need both carbon (C) and nitrogen (N) in the right ratio. Optimally, the nutrients in a compost pile should be about 30 parts C and 1 part N (30:1).
In a compost pile, air and water compete for the empty pore space between the solid particles. The most efficient microbes are aerobic thermophiles (those requiring oxygen). They need air and water in the proper balance so they can eat the nutrients dissolved in the water but still breathe enough air (oxygen) to digest the nutrients and generate heat. A moisture content of about 50 to 60 percent by weight is about right. If the pore space dries out too much, the microbes will die. But if the pore space floods with water, a different set of microbes – the anaerobes – will out-compete the aerobes for food. Anaerobes are generally the ones responsible for foul odors.
Although thermophilic microbes generate their own heat, they are too small to stay warm on their own. So a compost pile should have 3 to 5 feet of porous compost materials surrounding its core to serve as an insulator. This will keep the core at the necessary 130 degrees or higher if all other conditions are right—even through a snowy winter.
Tools You Will Need
To build a compost pile you will need:
- Carbon-rich material such as sawdust, small wood shavings, ground-up woody plants from a community brush-chipping site, rotten hay bales, cotton gin trash, shredded sugar beets, peanut hulls, or other brown-colored crop residues. Mixing two or three types of carbon-rich material together works best. The wider the variety of particle sizes in your pile, the better the balance will be among air movement, insulation, pile strength and surface area for the microbes to feed on. You will need about 3 to 5 cubic yards of the material for every 1,000 pounds of carcass—less if the material yields its carbon easily, more it if does not. “Seed” the pile of material with some manure, broiler litter or unfinished compost ahead of time to kick-start the composting process.
- A front-end loader or other machine that can move the carcass, assemble and turn the pile and load the finished compost into a spreader truck. You won’t need the loader every day, but you will need access to it to build the pile, to turn it every 3 to 6 months, and also to turn it in emergencies, such as if rainfall drenches the pile or the pile gets too hot for safety. The larger the loader, the faster you’ll be able to get the job done.
- Water. You will need to mix water into the pile every couple of months as the high interior temperatures dry it out. If there is a well or water line near by, you can set up a polyethylene tank to hold water and rig it with a float valve so that it stays “topped off” and ready. If one of your stock tanks stays wet year-round, you can simply lay a suction line with a foot valve into the middle of the pond–hang it from an inflated inner tube if there’s a chance the water level will drop significantly during the year–and run the suction line into a small, gasoline-powered water pump. A high-pressure nozzle, especially one with an adjustable spray pattern, will give you extra flexibility and improve your efficiency. It is better to use nonpotable water rather than drinking-quality water as long as your pump will handle it. Effluent from a holding pond or lagoon is perfect for keeping compost piles moist because it usually has an extra shot of nitrogen that will feed the compost microbes.
- A long-stemmed thermometer for measuring the temperature at the core of the pile.
- A tool for opening the carcass. The larger the carcass, the longer the composting process will take. It is often helpful to open up or quarter a larger carcass to give the microbes more surface area to work on. You can perforate the carcass with large shears, a hunting knife or a necropsy knife. If you want to go a step further, or if you need to limb the carcass to make the pile more compact, then a big hacksaw or bolt-cutter will also help. Opening the carcass speeds decomposition, but it is optional. A carcass is usually put in a compost pile long before it has a chance to ripen, and then the compost microbes perforate the carcass themselves. If you do that, you will notice that the pile will seem to have collapsed not long after you assemble it. This is called “yielding.” When that happens, examine the pile closely to see that the carcass remains well covered on all sides, or predators will take notice.
Caution: If you suspect the animal died from a zoonotic disease (one that can be transmitted to humans), do not open the carcass. Instead, notify your veterinarian and local authorities immediately.
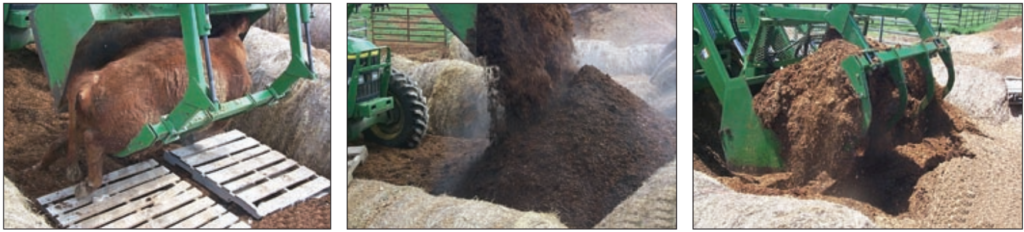
Figure 2: A front-end bucket/grapple loader is a versatile piece of machinery for depositing carcasses (left) on a compost pile and for building (center) and turning (right) the pile.
Building the Pile
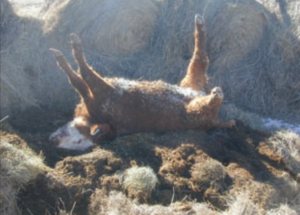
Figure 3: The limbs may need to be removed with a hacksaw, bolt cutters or shears to reduce the pile’s total volume. Lay the severed limbs beside the carcass.
The first thing to recognize when you’re learning to build a compost pile for carcasses is that animals are more than 50 percent water, much of which is contained in the gut and the blood stream. When the carcass “yields,” there may be a flush of liquid (called leachate) that drains from the carcass shortly thereafter. You don’t want leachate to percolate far into the ground or run downhill into a creek, stock tank or wellhead. To prevent this you will need to select a good site for the compost pile and prepare the site with a dry, absorbent base material.
Selecting a Site
Select a site that is well away from the nearest public road and from water troughs, stock tanks, stables, residences, guest houses and picnic areas (yours and your neighbors’).
The site should be well vegetated to reduce the environmental impact. Vegetation soaks up pile leachate and keeps it from draining into the water table or running off into surface water. Plant root systems help maintain soil porosity, which reduces runoff, but too much porosity may cause seepage into groundwater.
Choose a site where the soil contains some clay to make it less permeable. Highly permeable, sandy soils do not have a lot of structural strength, which means that heavy machinery will easily disturb them. They also drain very quickly so that plant roots have less time to capture the nutrients and other dissolved solids contained in pile leachate before it percolates into the ground. This can cause pollution if the water table is shallow. If the best site for your pile is unvegetated, then it should be paved with clayey soils, caliche, crushed “bottom ash” (a cement-like residue from coal-fired power plants) or some other material to make it less permeable. Or, the material can be mixed into the soil and compacted in place to reduce seepage into ground water.
A site at the top of a hill is best because the more wind there is the more rapidly odors will disperse. If a compost pile is built where winds are lighter, as in a sheltered valley, odors will be more intense and persist farther downwind.
Building a Base
For efficient composting, the main bulk of the compost pile must be kept at a moisture content of 50 to 60 percent by mass (wet basis). But precipitation and/or a collapsing carcass may yield a flush of moisture that saturates the pile and then drains through the base of the pile. To capture that leachate before it reaches the soil or pavement surface, the pile needs a dry, absorbent base layer. This layer should be thick enough (at least 18 inches thick) and strong enough to support the weight of the carcass without being significantly compacted. The heavier the carcass, the thicker the base layer should be. It should also be dry, absorbent and carbon-rich. Examples of excellent base materials are ground hay or straw, gin trash, finished compost, nut hulls or sawdust.
Adding the Carcass and Compost Mix
In the finished compost pile, the carcass should be surrounded by at least 12 inches of moistened, well mixed co-composting materials. Begin by putting a 12-inch layer of compost mix over the base layer. If you are using highly carbonaceous materials such as wood shavings or sawdust, mix in some manure, holding-pond effluent or nitrogen fertilizer to accelerate composting. A better approach is to mix this material, moisten it, and have it already composting in a pile somewhere close by. After spreading some atop the dry base layer, the pile is ready for the carcass.
It is important that no part of a carcass be exposed; otherwise, predators will be attracted to the site. Once a predator has discovered an animal carcass, it will return again and again to the same site no matter how well the carcass is covered later. A 12-inch (minimum) layer of co-composting material around all sides of the carcass will discourage predators. It will also ensure thorough, uniform heating of the carcass and reduce odor.

Figure 4: The co-composting material being used here is a moist mixture of horse manure and wood shavings bedding from a veterinary clinic.
To reduce odor and predator access even further, some composting specialists recommend covering the finished pile with the same dry materials used as the absorbent first layer. Doing so will improve pile insulation and heat retention, reduce oxygen transfer, and increase the volume of compost feedstocks. But it may not eliminate all odor and predators, and it is more expensive. Merely covering a poorly constructed pile with additional dry material will obscure a problem rather than solving it.
Protecting the Pile from Weather
Rain, snow and cold are important considerations in carcass composting. In rainy areas it is important to keep piles from getting too wet because that encourages the anaerobic microbes that generate foul odors. In wetter climates, then, piles should be designed with steep, pointed crowns and sloping sides to shed rain rapidly. A pile with a triangular cross section will shed water more efficiently and have a higher rate of evaporation than a pile with a rectangular, trapezoidal or semi-circular cross section. Or, you can put a roof over the pile. Construction plans for covered compost piles are available from the MidWest Plan Service (www.mwpshq.org) or the Natural Resource, Agriculture and Engineering Service (www.nraes.org).
In the semi-arid regions of the state it is more likely that the pile will dry out and go dormant. To capture scarce rainfall or snow, a pile can be built with a flat or concave top. Efficient composting in dry areas will require a ready source of supplemental water as the pile dries out over time.
It is possible to compost carcasses successfully even in the north. An active compost pile will melt snow accumulations if it is large enough to insulate itself and retain heat in the core of the pile. The larger the pile, however, the greater the threat of spontaneous combustion as biological self-heating gives way to chemical oxidation, which does not require microbes.
Supervising the Process
You will need to monitor the temperature and moisture content of the compost pile over time.
The easiest way to measure temperature at the pile’s core is with a long-stemmed thermometer. It must be long enough to reach to the center of the pile. A 48-inch probe costs about $150.00. One model is the Reotemp 48-inch Heavy-Duty Windrow Thermometer (www.reotemp.com). Other manufacturers marketing good quality probes include Geneq (www.geneq.com), Omega (www.omega.com), Tel-Tru (www.teltru.com) and PTC Instruments (www.ptc1.com). Be sure to read the instructions carefully to learn how to insert the probe without bending or breaking the stem. Measure the temperature at various locations to determine its uniformity.

Figure 5: A long-stemmed, dial-type thermometer is used to monitor pile temperatures.
There are also electronic thermometers that can be buried in the compost pile and read without disturbing it, as well as automatic electronic devices that are buried in the pile and that collect temperature data continuously for weeks or months. If you install enough of them at different locations in the pile you can get a sense of the temperature uniformity. You might even attach an electronic cable to allow you to download temperature data from these units to a laptop without removing them from the pile. We have placed HOBO data loggers (Model H8, Onset, Inc.; www.onsetcomp.com) inside custom-made vessels of PVC pipe, attaching a steel wire tether to the housing and tying the free end of the tether to a fencepost next to the pile. Figure 6 represents the averages of the measurements from several HOBO units installed around and within the carcasses during pile assembly. Unless you improvise a serial cable to each one, data from the HOBO units cannot be used for real-time diagnostics but will be useful for after-the-fact analysis. A long-stemmed thermometer is the most flexible device for measuring temperatures in several different locations in a pile or in several different piles. A properly built pile should reach thermophilic conditions (130 to 150 degrees F) within 2 or 3 days and remain there for at least 2 weeks. If the temperature in the pile remains below 130 degrees F,
- the pile is either too wet or too small; and/or
- the pile’s carbon source may be too large-grained to insulate well; or
- the carbon source may be too small-grained to let adequate oxygen enter the pile.
If the temperature gets much above 150 degrees F, the composting process will slow, the risk of spontaneous combustion will increase, and the pile will need to be moistened and turned.
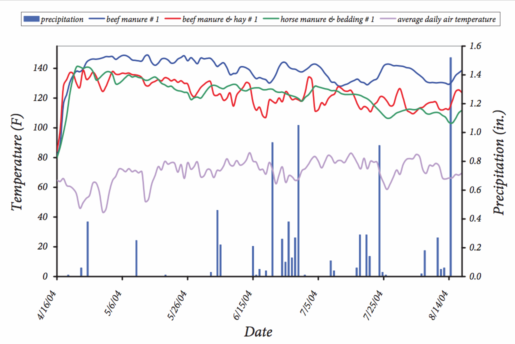
Figure 6: Averages of several HOBO data loggers within a compost pile.
Moisture is the other major influence on the composting process. The base layer should be very dry, but the co-composting material that covers the car cass should be 50 to 60 percent moisture by weight, decreasing slowly as the process progresses. Checking compost moisture is simple. Wearing gloves, grab a handful of the mixed material within the pile and squeeze it. Look for droplets coming out of your fist. If they do, that sample of material is too wet. If not, drop the material and look at the palm of your hand. If it does not have an obvious sheen of water on it, the sample was too dry. Material that is too wet may have an offensive smell; material that is too dry may not smell at all.

Figure 7: Monitor the moisture content of the pile.
Composting –Phase I
Once the composting process is underway, leave the pile alone for a few months except to check the temperatures and moisture content. The larger the animal, the longer it will take for the soft tissue (muscles, viscera, ligaments, cartilage, fat) to be converted to humus. A 1,400-pound dairy cow or a 1,600-pound horse may need 6 months of active composting to clean off the bones; a 500-pound calf may need only 3 or 4 months. If the temperature gets too high and the compost is drying out, turn the pile thoroughly and add water to get the moisture back up to near 60 percent. If any soft tissues are exposed during turning, add more of the carbon-rich co-composting mix to cover it to a 12-inch depth again. Phase I, the active composting phase, ends when the soft tissues are degraded and the bones are clean. Then it is time to turn the pile and add water again.
Composting—Phase II
After the pile is turned and moistened, the compost should heat up again and the decomposition process should continue. During this secondary phase the microbes finish off most of the available carbon and nitrogen and convert it into microbial biomass. At this point only the skull, pelvis and other large bones may still be present. Let the Phase II pile sit for about 2 more months until the temperature drops to within 10 degrees or so of the air temperature. Then turn the pile one more time and allow it to “cure” so that the remaining organic compounds (for example, acetic acid) will degrade all the way to carbon dioxide and water vapor. This curing phase helps ensure that the compost can be safely applied to pastures, gardens or cropland. At the end of this phase, some of the larger bones, which are mostly hollow and brittle, may still be intact but they will degrade easily once the cured compost is applied to land.
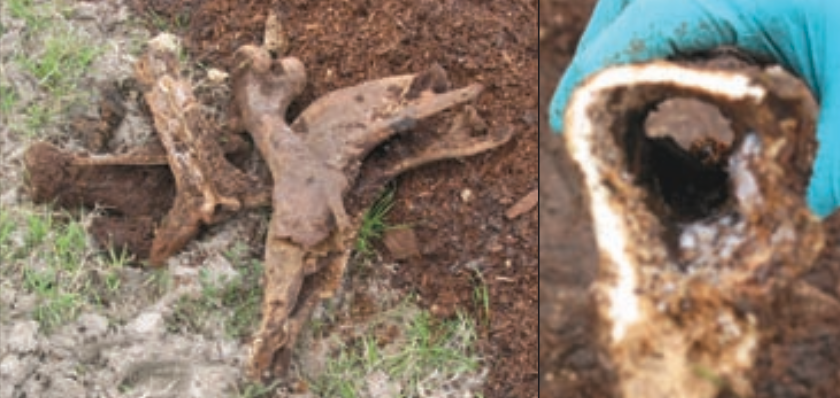
Figure 8: These bones of a 2,000-pound cow that remain from a cured compost pile are brittle, hollow, and fairly easy to crush.
Using the Compost
Use the compost you manufacture on your own land and apply it at the proper rates for the crop. (Your county Extension agent can advise you about these rates.) The Texas Commission on Environmental Quality (TCEQ) may require you to get special permission to give away or sell the compost. If it will be used on land other than your own, be sure to disclose what the ingredients were before the transaction is completed.
Summary
If done properly, composting large animal carcasses is an environmentally sound process. If done improperly, it can create nuisance odors for you and your neighbors and pollute the water and soil.
Acknowledgement
Funding for the 2-year demonstration project and for this publication was provided by the United States Department of Agriculture Cooperative State Research, Education and Extension Service (National Integrated Water Quality Grant No. 2002-51130-01513).
Original article by Brent Auvermann, Saqib Mukhtar and Kevin Heflin
Produced by Agricultural Communications, The Texas A&M University System
Extension publications can be found on the Web at: http://tcebookstore.org
